Steps to Create a Recurring Commission Program
It takes time to develop a quality business online. When thinking of a brand, there’s a lot that goes into it, such as the name, design, traffic, and generally how you’ll keep that momentum going long enough to create some stable sales. Think of how you’ll build an income to keep your store afloat. One option to take is by developing a recurring commission program. This is a sound method because you’re creating a system that has people on a yearly or monthly schedule. This way, you can set things up with affiliates to also give them benefits. Here’s a step by step guide to help create your program.
Step 1: Find a Good Affiliate Program
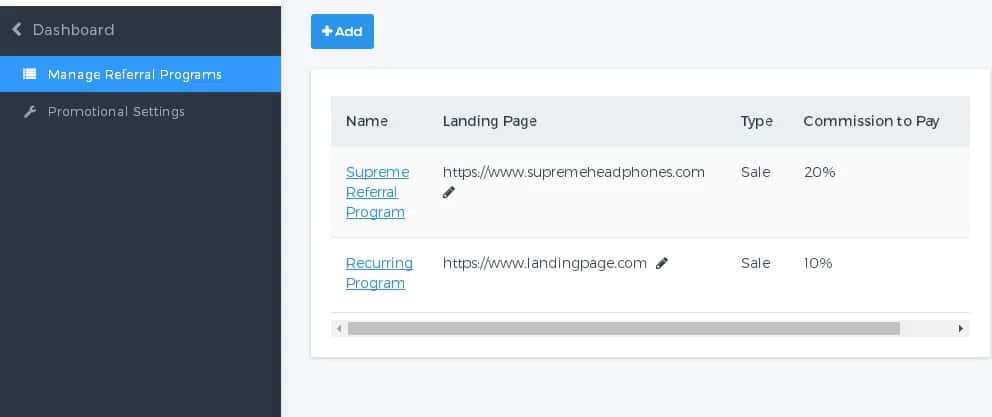
Whether you’re going on affiliate or referral program search, you can hear to the dashboard to help you “Manage Referral Programs.” The next step is to click the add button.
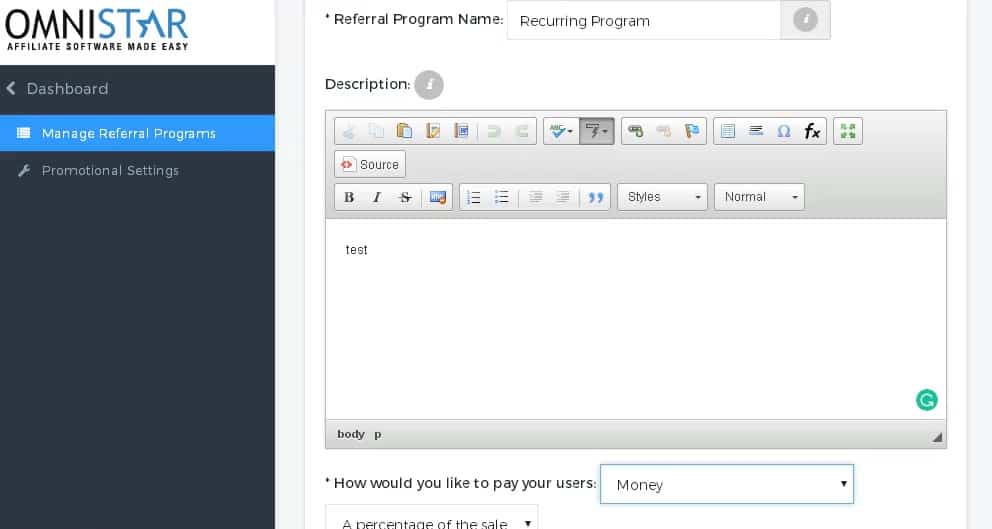
After clicking the add button, you’ll get this to screen in order to put in program name, such as “Recurring Program.” In this section, find some good text that will help you get organized. Also, what type of payment method do you want for your users?Using money will probably be the most efficient manner of getting things done. Also, consider the amount of commission each affiliate gets per sale. Now, it’s time to look at the recurring features.
Step 2: Start Creating the Recurring System
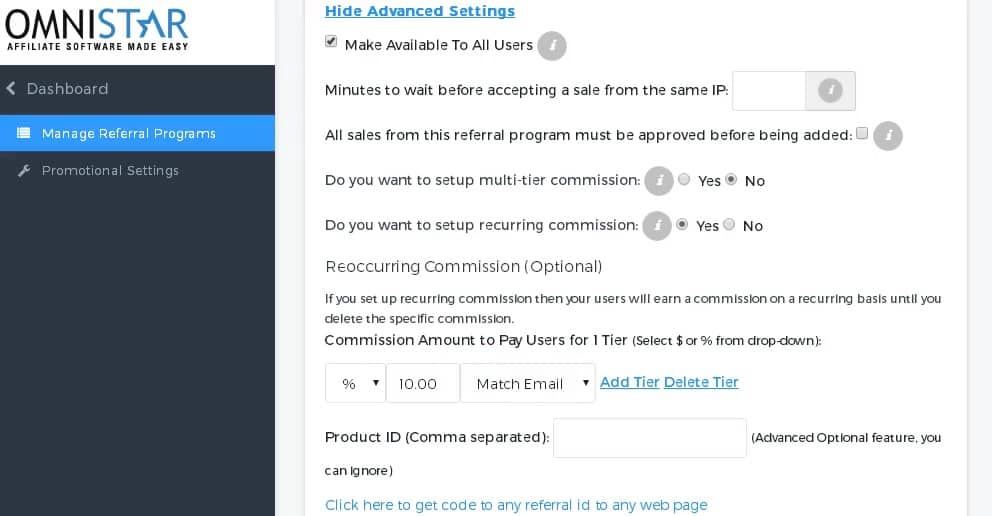
At this point, you’ll go to the advanced features. You can make it accessible to all your users. Also, this helps you approve of sales and track them through your own affiliate program. When you create the recurring commission, make sure it has the right follow through with the emails as well. At this point, you can manage referral programs and get the right URL landing page.
Step 3: Get Your URL Landing Page
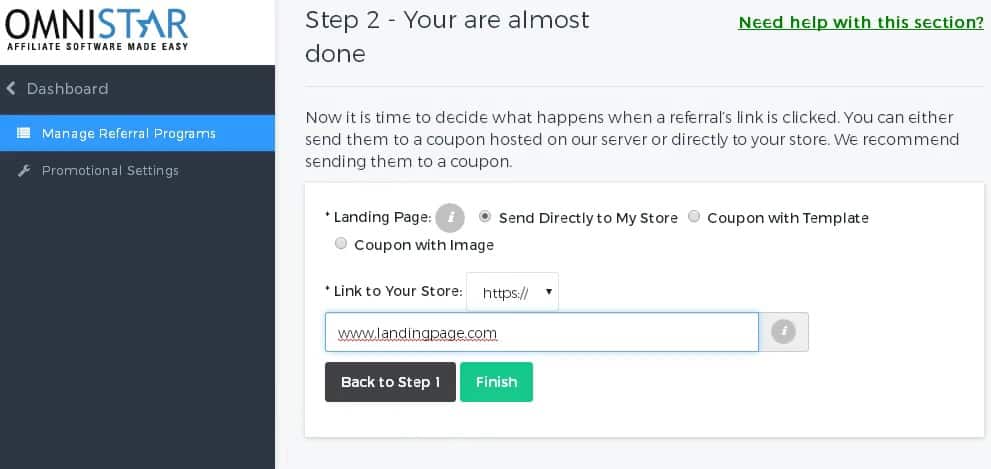
Make sure that you develop the right landing page that will attract good attention to your brand. It’s about having the right setup that will allow you long-term prosperity. Now, it’s time to get the code put together.
Step 4: Go to the Get Thank You Page
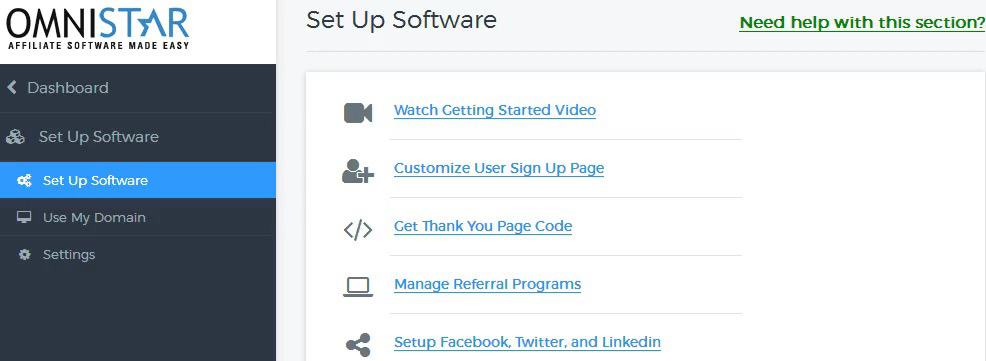
Now, click the Get Thank You Page section. Pick a suitable shopping cart that will match your goals for the new recurring commission program. Pick from the selection below:
Step 5: Choose a Quality Shopping Cart
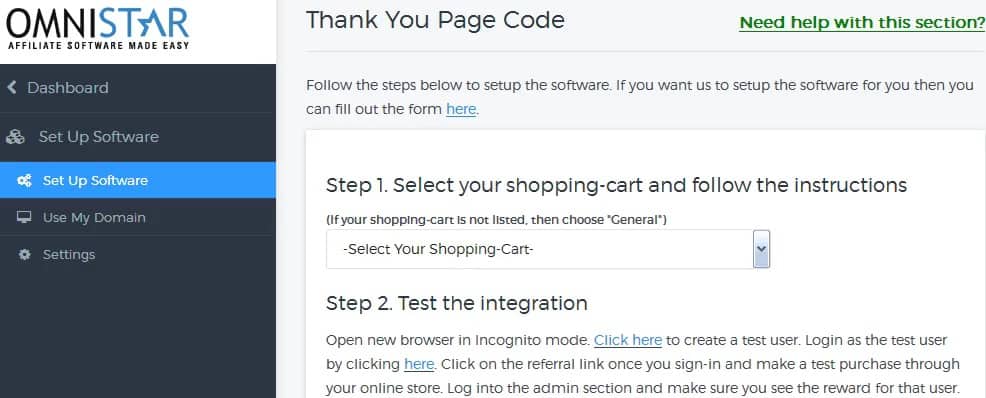
From the selection of options in this drag down, you want to scroll to the recurring commission option. You want to pick the email match choice. Take a look below on how to do things specifically for creating a code that will work with your store.
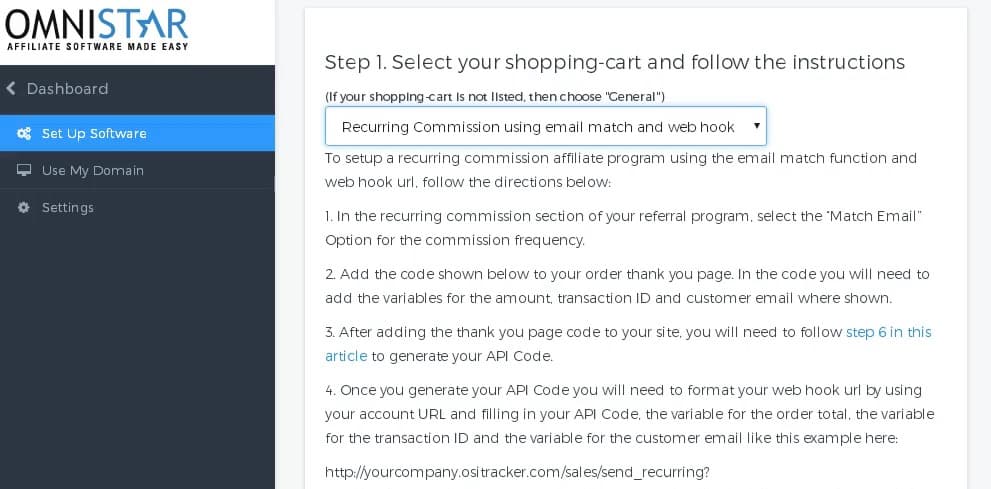
Follow the steps to help you get your commission together. The information in the code have some placeholders, but you can actually change the variables yourself to fit the actually function of the ecommerce store.
Step 6: Input Thank You Code
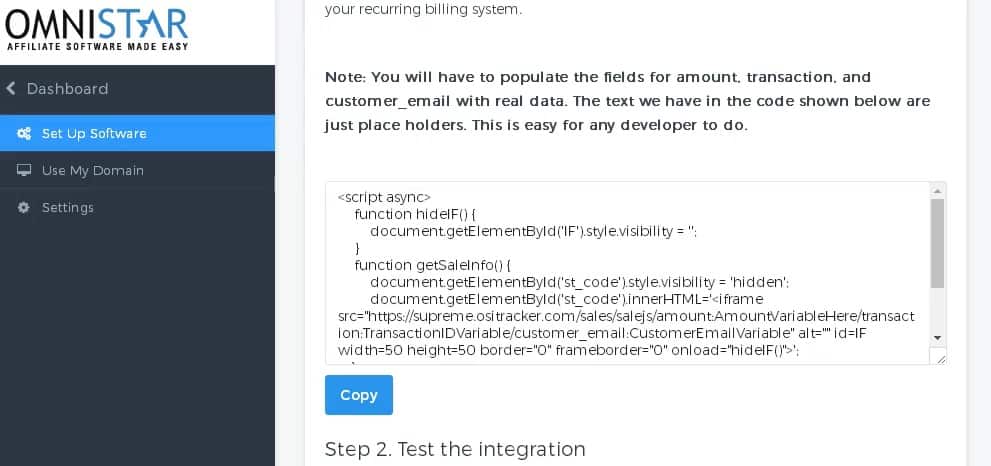
As stated previously, think about how you’ll populate the fields for the amount, transactions, and even customer email in regards to the real data. The code below is a basic one that will give you a solid foundation as far as customizing things:
<script async>
function hideIF() {
document.getElementById(‘IF’).style.visibility = ”;
}
function getSaleInfo() {
document.getElementById(‘st_code’).style.visibility = ‘hidden’;
document.getElementById(‘st_code’).innerHTML='<iframe src=”https://supreme.ositracker.com/sales/salejs/amount:AmountVariableHere/transaction:TransactionIDVariable/customer_email:CustomerEmailVariable” alt=”” id=IF width=50 height=50 border=”0″ frameborder=”0″ onload=”hideIF()”>’;
}
window.onload = getSaleInfo;
</script>
Now, this is the time to go to the dashboard on the left. You can scroll under your the username and go to the “Modify Profile” option.
Step 7: Modify Profile
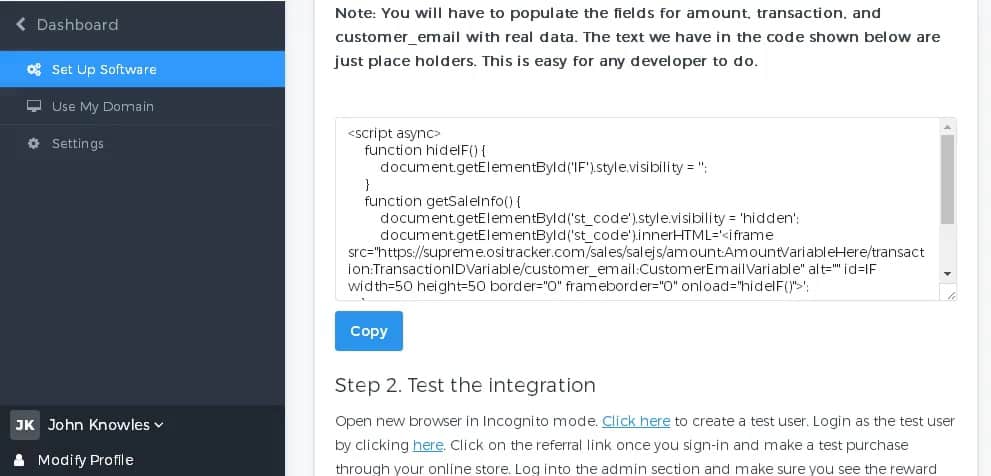
Now, you want to go to this page and get the API Code. This key text is important for getting your new recurring system to function well.
Step 8: Copy the API Code
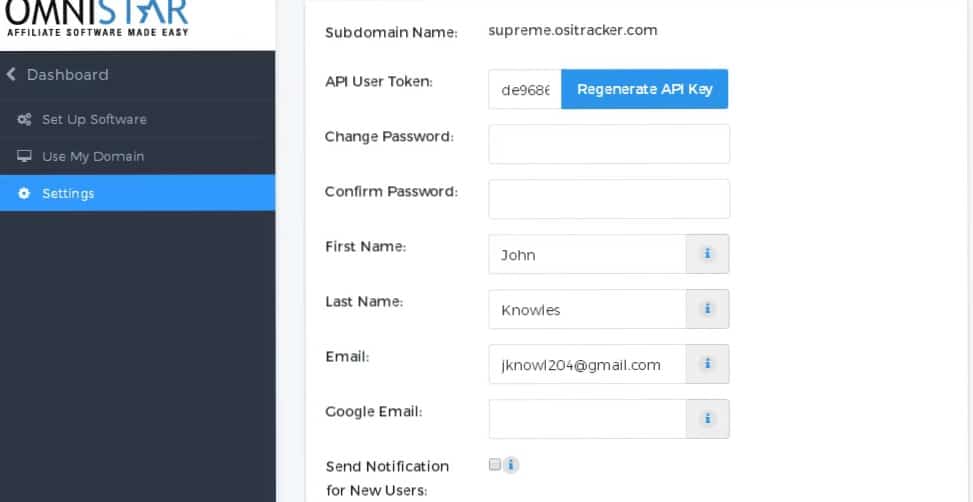
Take a look at the setting section in the dashboard and you’ll generate API Key. We have an example of some of the code. Go to the API User Token to choose the key code right there. Select the set up software section to get directions on the appropriate text for putting the code in well.
Step 9: Generate API Key
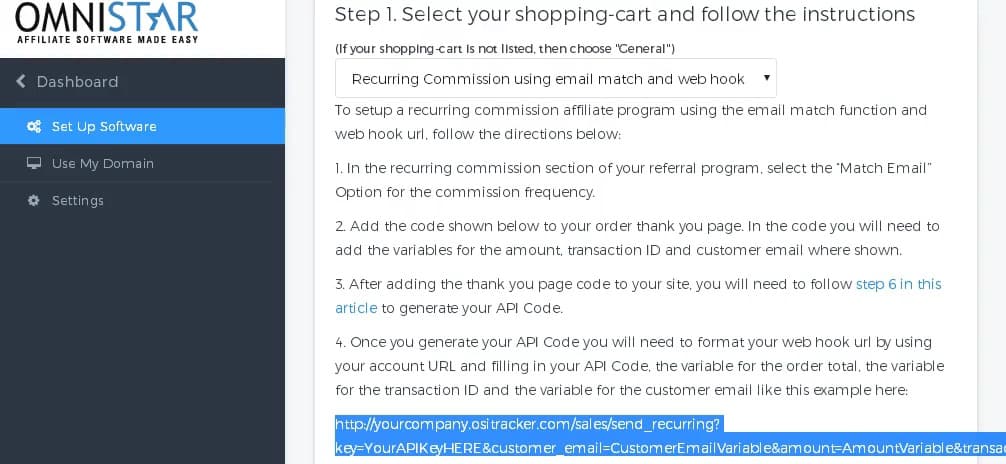
Take a look at the text on number 4. That’s the general code. Change a few elements in that section to match with the settings and the API Code. When that task is done, you’ll be good with creating the recurring program.
This is the basic line:
This is the portion where you make some slight changes to help match up to the specific recurring campaign you intend to run.
- Alter this section of “Your APIKeyHERE” to the API Key you copied earlier. In case you don’t need it right away, store the key in a safe file.
- Put the customer email variable that you generated earlier from the “Get Thank You Code Page.”
- Now, put the amount for the amount variable total.
- Take the Input variable from the transaction ID.
- Now, place the right software location where it says “http://yourcompany.ositracker.com/”
When all of these alterations are made, you can then copy the full line into your web hook section of the recurring billing system or your membership program.
This is a keen manner in order to develop your recurring commission for your web store.

Nice step by step guide, I was able to do it on my own.
I was in a hurry to do this, I have no knowledge but i’m excited, Im happy even with zero knowledge I was able to make it work through this guide.
What software is this? Looks good and easy.
Thanks for the guide! Helped a lot.
Omnistar has great guides that are literally step by step there’s no chance of getting lost.